
how to enable virtualization windows 11 is usually a two-part job: confirm your CPU supports it, then turn it on in BIOS/UEFI and make sure Windows features aren’t blocking the use case you care about.
People run into this when Android emulators refuse to start, VMware/VirtualBox throws VT-x/AMD-V errors, or WSL 2 and Docker Desktop complain about missing virtualization. The confusing part is Windows can say “Virtualization: Enabled” while your app still fails, because different features (Hyper-V, VMP, Memory Integrity) change how virtualization is provided.
This guide keeps it practical: quick checks, BIOS/UEFI steps for common brands, what to toggle in Windows 11, and how to verify you’re actually good to go for your specific tool.
What “virtualization” means on Windows 11 (and why it matters)
On Windows 11, “virtualization” usually refers to hardware virtualization support in your CPU, exposed as Intel VT-x/VT-d or AMD-V/IOMMU, then used by Windows features like Hyper-V, Virtual Machine Platform, and WSL.
In plain English, it lets Windows run another OS or a protected sandbox efficiently. Without it, many workloads fall back to slow software emulation or fail outright.
- Virtual machines: Hyper-V, VMware Workstation, VirtualBox
- Developer tools: WSL 2, Docker Desktop, Windows Sandbox
- Emulators: Android emulators (often prefer Hyper-V-based acceleration on Windows 11)
According to Microsoft, features like WSL 2 and Windows Sandbox rely on virtualization capabilities to function as designed.
Fast pre-checks: confirm support before you reboot
Before you touch BIOS settings, verify what Windows 11 currently detects. This saves time and avoids “I toggled something and nothing changed” frustration.
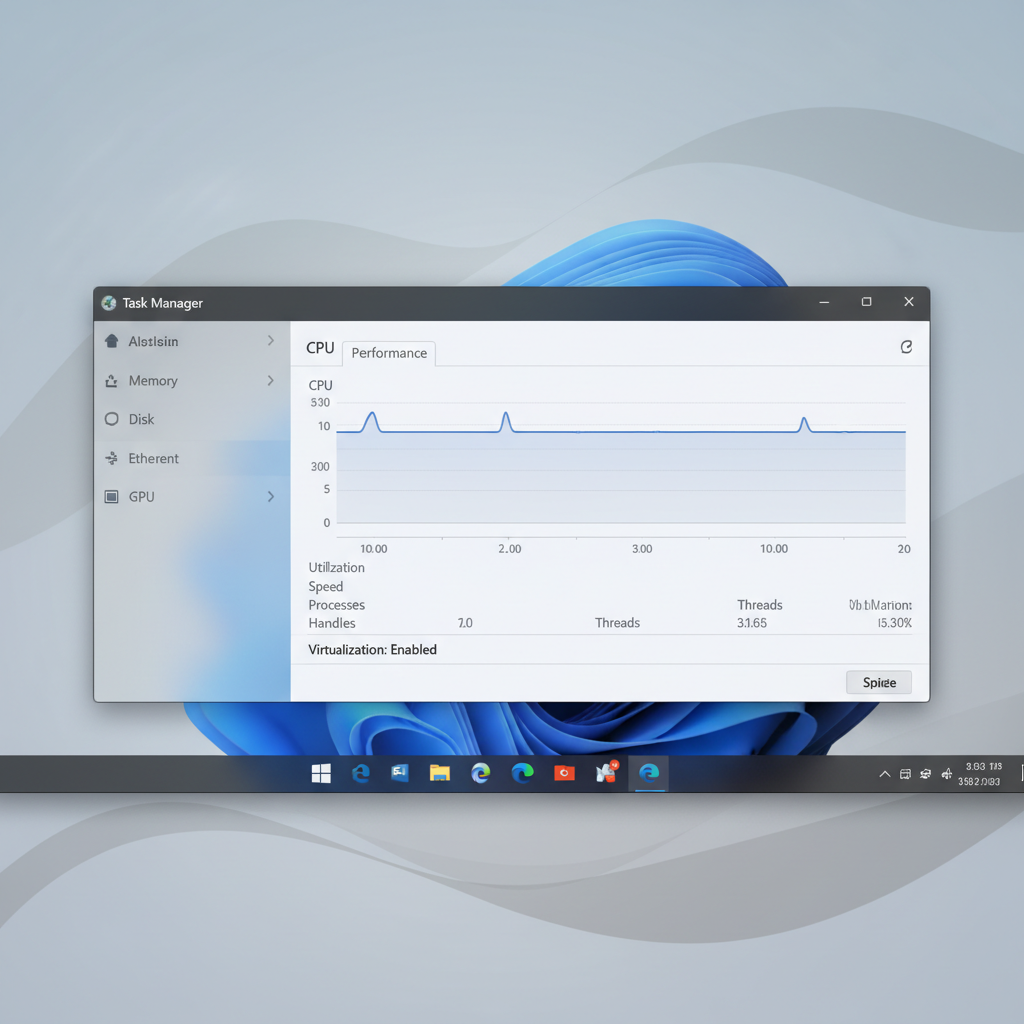
Check in Task Manager (quickest)
- Press Ctrl + Shift + Esc
- Go to Performance → CPU
- Look for Virtualization: Enabled/Disabled
If it already says Enabled, your issue might be Windows feature conflicts (we’ll cover that), not BIOS.
Check system info (more detail)
- Press Windows + R, type msinfo32
- Look for Hyper-V Requirements lines
You want to see items like “Virtualization Enabled in Firmware: Yes.” If it says No, you’ll need BIOS/UEFI changes.
Know your CPU vendor terms
- Intel: Intel Virtualization Technology (VT-x), sometimes Intel VT-d
- AMD: SVM Mode (AMD-V), sometimes IOMMU
One more reality check: some company-managed laptops restrict BIOS virtualization. If you can’t find the option at all, that’s a common reason.
Enable virtualization in BIOS/UEFI (Windows 11 PCs)
This is the step most people mean when they search how to enable virtualization windows 11, even though it’s technically a firmware setting.
Tip: If you have BitLocker enabled, make sure you have your recovery key saved. BIOS changes can occasionally trigger a recovery prompt.

How to enter BIOS/UEFI on Windows 11
- Open Settings → System → Recovery
- Under Advanced startup, click Restart now
- Choose Troubleshoot → Advanced options → UEFI Firmware Settings → Restart
Alternatively, many PCs use hotkeys at boot: Del, F2, F10, or Esc (varies by brand).
Where the virtualization toggle usually hides
Firmware menus vary, but these paths are common:
- Advanced → CPU Configuration → Intel Virtualization Technology or SVM Mode
- Security → Virtualization
- System Configuration → Virtualization Technology
Enable the setting, save, then exit (often F10).
Brand hints (not perfect, but helps)
- Dell: Virtualization Support → Enable Intel VT / VT-d
- HP: System Configuration → Virtualization Technology (VTx) / VT-d
- Lenovo: Security → Virtualization or Configuration → Intel Virtual Technology
- ASUS/MSI/Gigabyte: Advanced → CPU Features → SVM/Intel Virtualization Tech
If you still can’t find it, check whether you are in “EZ Mode” and switch to Advanced mode. Some UEFI interfaces hide CPU flags until you do.
Windows 11 features that can help (or conflict)
After BIOS/UEFI, Windows features decide how virtualization is used. This is where a lot of “it’s enabled but my app won’t run” stories come from.
Decide what you’re trying to run
Different tools prefer different setups. Here’s a practical map.
| What you want to run | Usually needs | Common conflict |
|---|---|---|
| WSL 2 | Virtual Machine Platform, Windows Subsystem for Linux | Firmware virtualization off, outdated Windows build |
| Docker Desktop (WSL 2 backend) | WSL 2 + virtualization enabled | Misconfigured WSL, disabled VMP |
| Hyper-V virtual machines | Hyper-V | Home edition limits (some features vary) |
| VirtualBox/VMware | Hardware virtualization | Hyper-V/VBS changes behavior on some setups |
| Windows Sandbox | Hyper-V components | Edition restrictions, virtualization off |
Turn Windows virtualization features on (when needed)
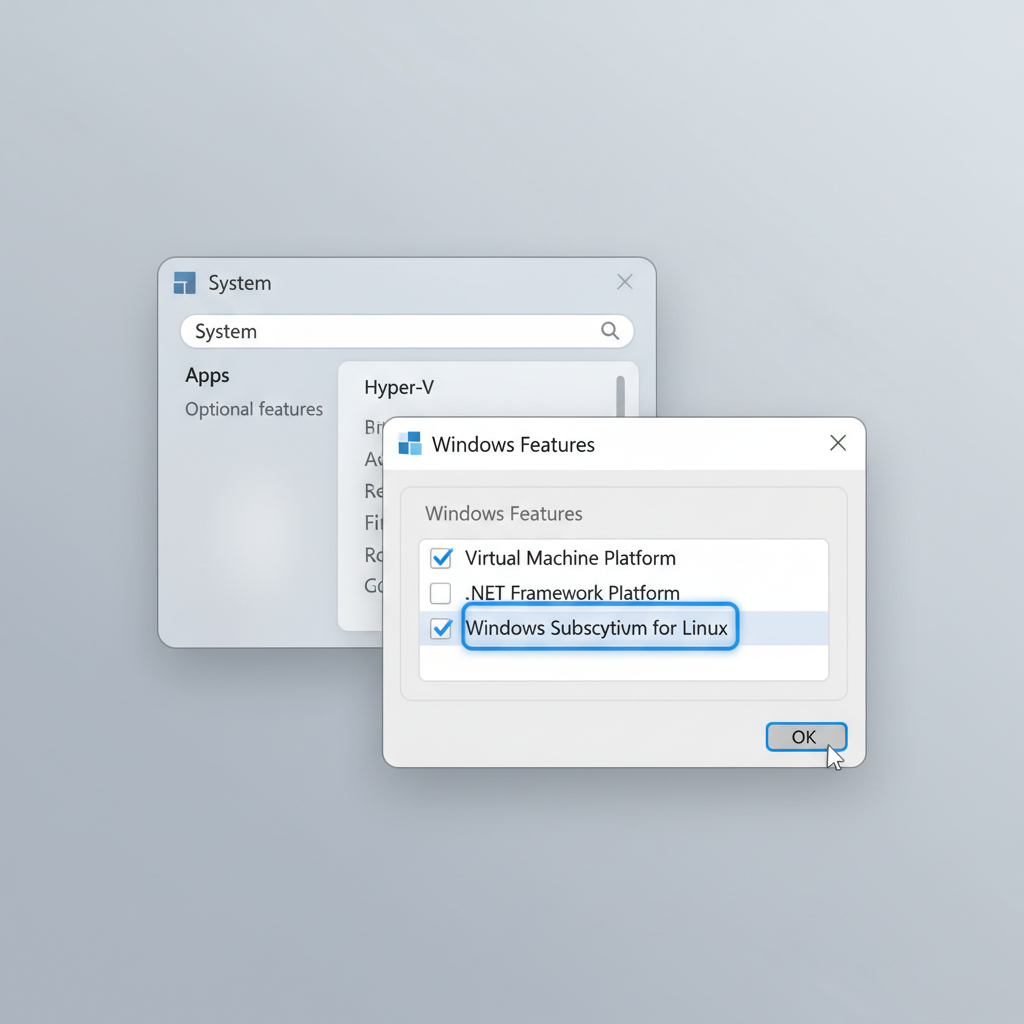
Open Control Panel → Programs → Turn Windows features on or off, then consider:
- Virtual Machine Platform (common requirement for WSL 2)
- Windows Subsystem for Linux (needed for WSL)
- Hyper-V (needed for Hyper-V Manager and some virtualization stacks)
- Windows Sandbox (if you specifically want it)
Restart after changes. Yes, it matters.
Memory Integrity and VBS (the “why is VirtualBox acting weird?” section)
On Windows 11, Core isolation / Memory integrity is part of virtualization-based security. It can be great for security, but it may affect how some third-party hypervisors perform or whether they can use certain acceleration modes.
- Check: Windows Security → Device security → Core isolation
- If your VM tool explicitly recommends toggling it, follow their guidance, then reassess security trade-offs
According to Microsoft, VBS uses virtualization to isolate sensitive processes. That’s the point, but it also means the virtualization layer is “busy” in a different way than older Windows versions.
Step-by-step: enable virtualization for common use cases
If you prefer a clean path instead of theory, use the flow that matches your goal.
For WSL 2 (recommended setup for most dev workflows)
- Enable virtualization in BIOS/UEFI
- Enable Windows Subsystem for Linux and Virtual Machine Platform
- Run in PowerShell (Admin): wsl --install (or update WSL if already installed)
- Reboot, then set WSL 2 as default if needed: wsl --set-default-version 2
If you see errors about “Virtual Machine Platform,” it’s usually a missing Windows feature toggle or firmware virtualization still disabled.
For Hyper-V virtual machines
- Confirm your Windows edition supports Hyper-V features you need
- Turn on Hyper-V in Windows Features
- Restart, then open Hyper-V Manager and create a VM
If Hyper-V won’t start, double-check msinfo32 “Virtualization Enabled in Firmware.” Hyper-V is picky about this.
For VMware Workstation or VirtualBox
- Enable virtualization in BIOS/UEFI
- Install the latest version of the hypervisor (newer builds tend to handle Windows 11 security features better)
- If performance is poor or you get VT-x/AMD-V errors, review Hyper-V and Memory Integrity settings
Some setups run VMware/VirtualBox “on top of” Hyper-V. That can work, but it may feel slower for certain workloads. If your use case is heavy VM work, you might choose to disable Hyper-V, but do it intentionally and expect trade-offs.
Self-check checklist: did it actually work?
Don’t trust a single indicator. Use two checks, it catches most misconfigurations fast.
- Task Manager: CPU → Virtualization shows Enabled
- msinfo32: “Virtualization Enabled in Firmware: Yes”
- WSL: wsl -l -v shows Version 2 for your distro (if using WSL 2)
- Hyper-V: Hyper-V Manager launches and can start a VM
Key point: If virtualization is enabled but your app still fails, focus on Windows feature conflicts and security settings, not BIOS.
Common mistakes (the ones that waste the most time)
- Enabling the wrong setting: VT-d/IOMMU is not the same as VT-x/SVM, you often want both, but VT-x/SVM is the usual blocker
- Forgetting to save and exit: some UEFI screens discard changes unless you explicitly save
- Assuming “Home vs Pro” doesn’t matter: it can, especially for Hyper-V UI tools
- Mixing guidance across tools: Docker, WSL, VMware, and emulators don’t all want the same Windows feature set
- Ignoring BitLocker recovery prompts: have your key ready before firmware changes
When you should ask IT or a pro
If this is a work laptop, virtualization settings might be locked by policy, or your organization may require VBS/Memory Integrity to stay on. In that case, “just disable security features” is not a responsible suggestion.
Also consider help if you see repeated boot issues after firmware changes, or if BitLocker recovery keeps triggering. A hardware vendor or IT admin can verify firmware versions, policy restrictions, and secure boot configuration without guesswork.
Quick wrap-up and what to do next
If you came here for how to enable virtualization windows 11, the reliable path is simple: confirm Windows detects support, enable VT-x/SVM in BIOS/UEFI, then align Windows Features with the tool you want to run. The last mile is verification, not more toggles.
Pick one target workload today, WSL 2, Hyper-V, or your VM/emulator, apply the matching steps above, then validate using Task Manager and msinfo32 before you move on to the next tool.